Tuesday, November 14, 2017

Do This 10-Minute Yoga Routine After Every Workout To Get Crazy Flexible

It'll help you relax, too.


Think of your workout as a meal. Your warm-up is your appetizer, the actual sweat session is your entree, and your cooldown is—wait... cooldown? "Most people skip stretching because they don't think it's important," says John Porcari, Ph.D., an exercise and sports science professor at the University of Wisconsin-La Crosse. "But gradually returning your body to its natural resting state is the best way to prevent cardiovascular and muscular mishaps."
So may we introduce to you: yoga for dessert. That's right, yoga—the age-old practice of controlling your breath, opening up your body, and quieting your mind—has become the cherry on top for boxing, indoor cycling, and boot camp. Trace it back to a growing emphasis on the mind-body connection and an increasing interest in restorative and recovery. In fact, instructors at buzzy niche studios (like NYC's Box + Flow and Studio 360) and big-name gyms (including Crunch) are replacing the standard quad-stretch-shoulder-roll quickie with 10 to 20 minutes of slow-flowing poses.
Smart thinking, since research shows that a single bout of yoga can reduce post-workout muscle soreness, thanks to improved flexibility. "Yoga gives your muscles a chance to relax and lengthen after they've been contracting throughout your workout, which should help you maintain range of motion even after intense exercise," explains Porcari. "It also helps lower your heart rate, so you can enter recovery mode faster." In other words, you'll be in better shape to max out your next workout, whatever it may be.
Of course, the mental benefits deserve a shout-out too. When you go-go-go during your session, then skedaddle, you don't get the full de-stressing perks of your hard work. "Exercise excites the nervous system, while a subdued yoga flow calms it," says Ryanne Cunningham, founder of Flow Yoga Studio in DePere, Wisconsin, and author of Athletes. "That's crucial to finishing your workout feeling optimistic, peaceful, and inspired—and hopefully, a little more appreciative of what your body just did for you."
But there's more! Even if you aren't a yogi, it's practically impossible not to look forward to a wind-down when you've been pushing yourself for half an hour or more. "You might even find yourself cranking up your intensity just to 'earn the reward,'" says Cunningham.
She created a short and sweet sequence exclusively for WH that'll complement any strength or cardio. You're in for a treat.

ZEN IN 10

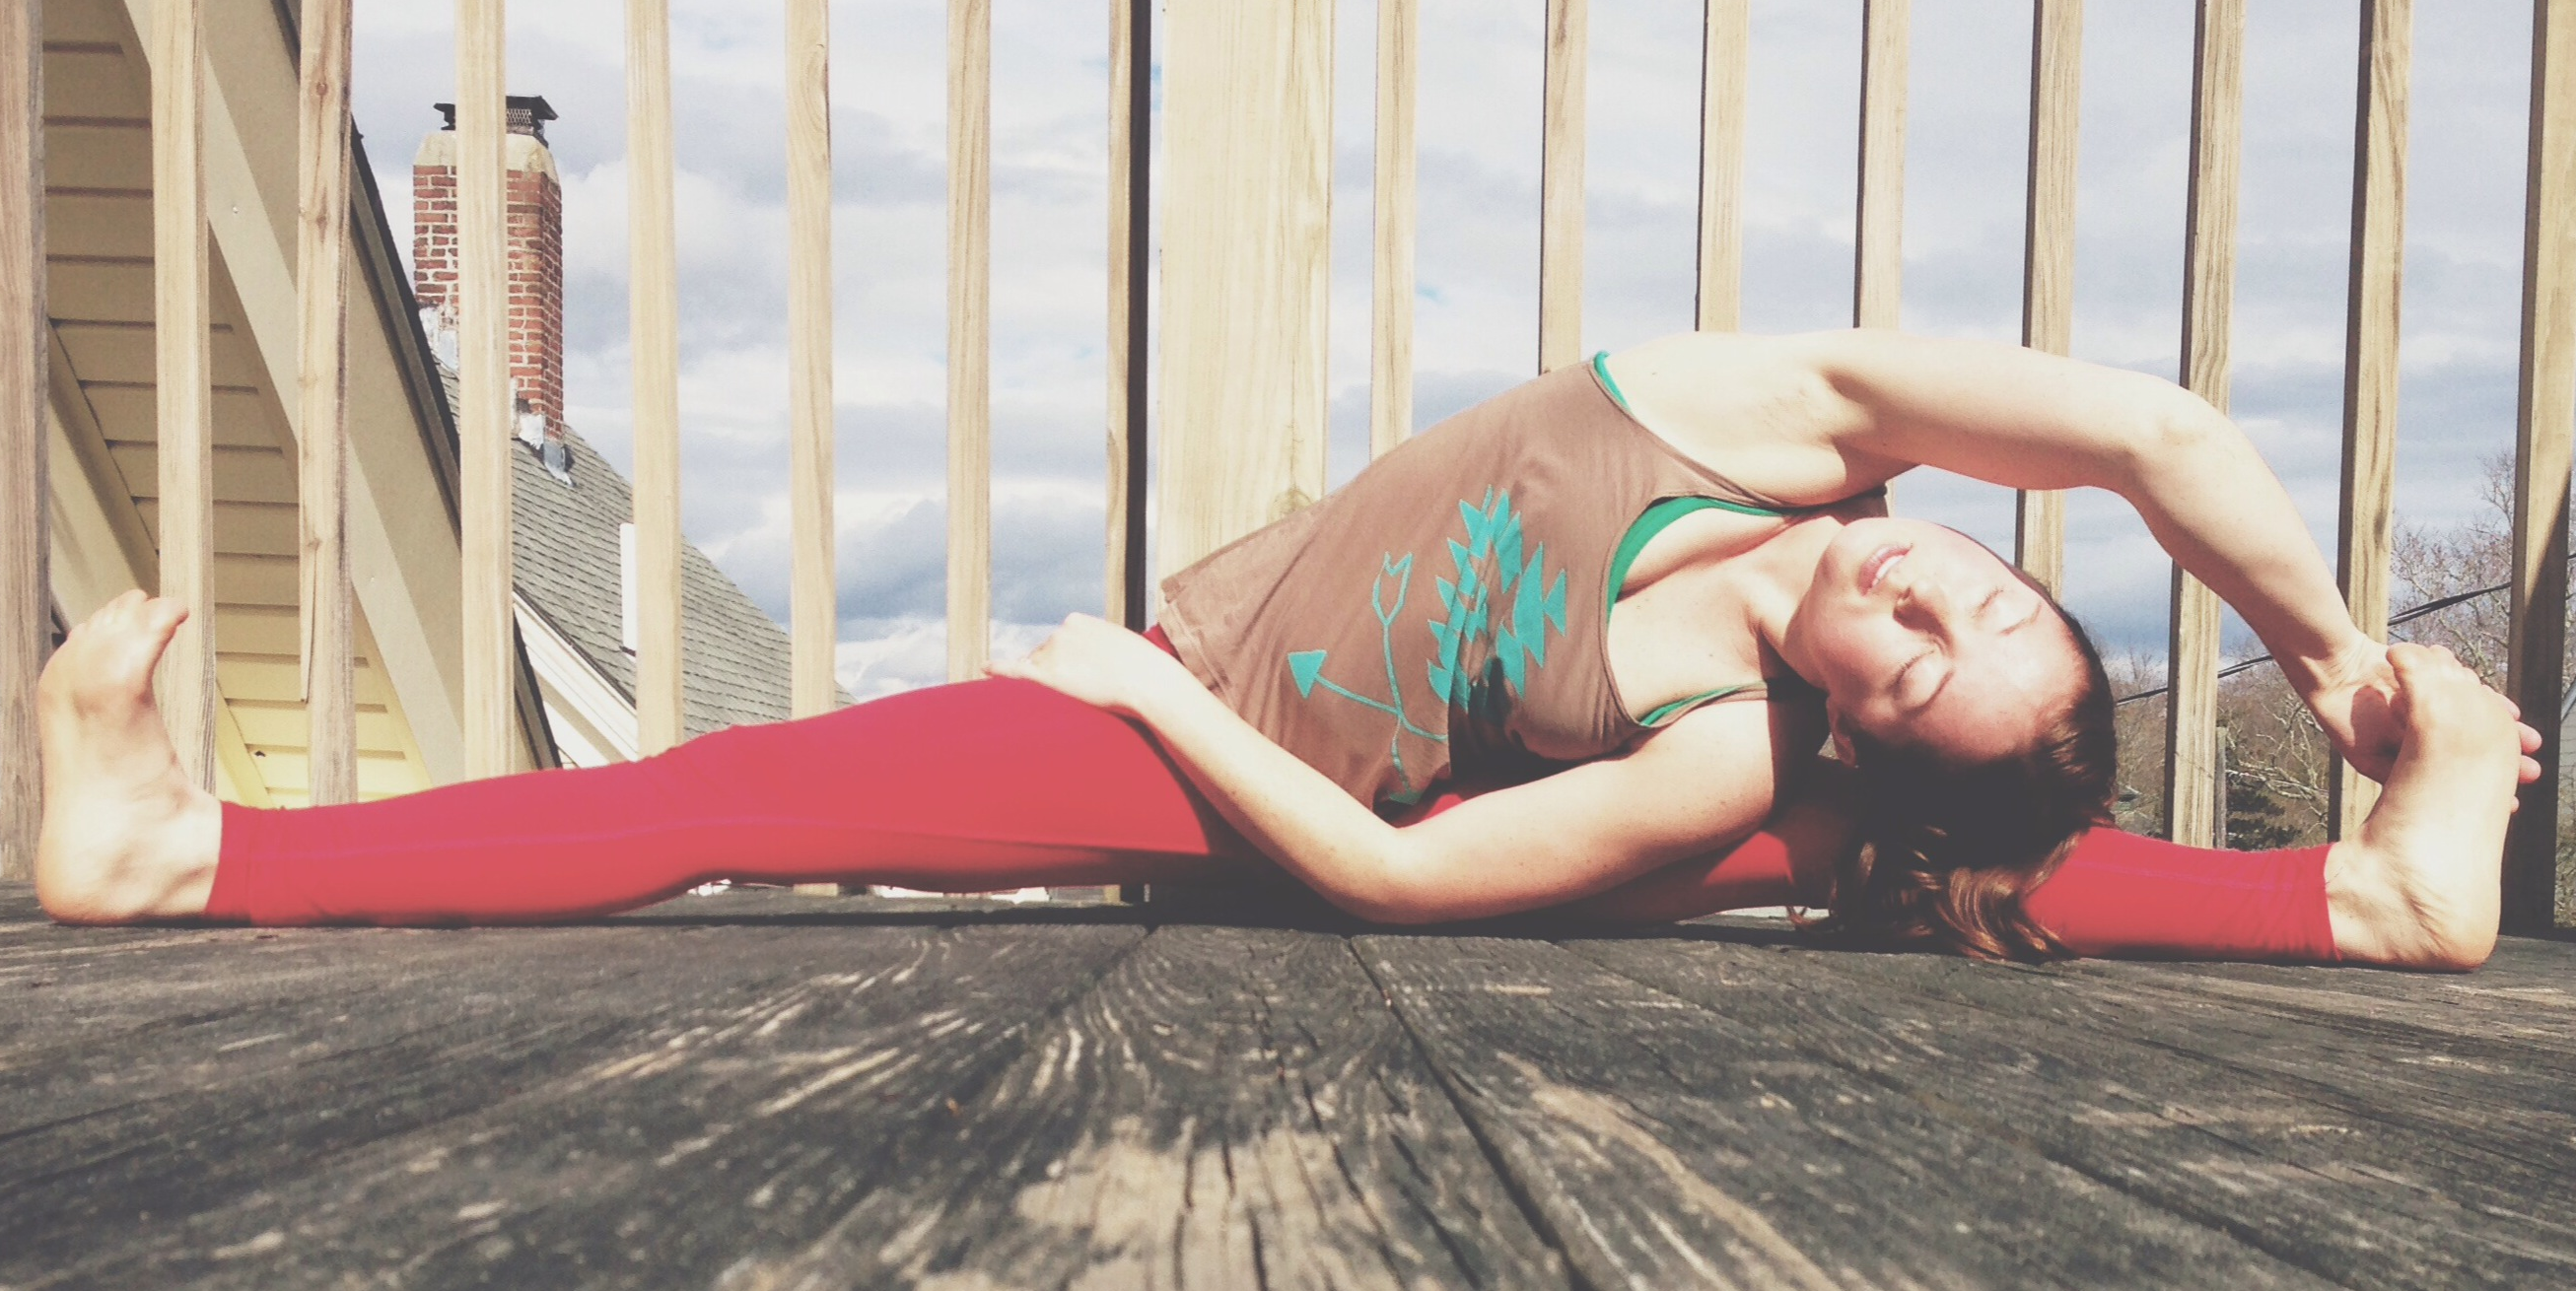
Yes, just 10 minutes! Directly after your workout, focus on slowing your breath bit by bit. Inhale for three seconds, hold for three, then exhale for three; add a count each round until you're inhaling, holding, and exhaling for six breaths. This gradually gets you from panting heavily to calm and focused. Then perform this flow in order, starting with your vinyasa and going back to it between every sequence. Repeat each sequence on the other side, vinyasa included, until you've made it to your final sequence, then repeat the entire flow twice. Optional: End with a minute or two in savasana(lying on your back).
Vinyasa
KAGAN MCLEOD
VINYASA
Start in a pushup, hands under your shoulders (a). Keeping your core engaged and elbows close to your sides, bend your elbows to slowly lower your body in one straight line until your arms form a 90-degree angle to the floor (b). Roll over your toes and straighten your arms to draw your chest forward, keeping your hips and legs a few inches off the ground (c). Plant your toes and push your hips up and back to finish in downward dog (d).

Warrior II to warrior II with arm stretch and triangle pose

KAGAN MCLEOD
SEQUENCE ONE

WARRIOR II TO WARRIOR II WITH ARM STRETCH

From downward dog, place your right foot between your hands. Ground your heels and lift up to stand. Bend your right knee and angle your left foot to face the top left corner of your mat. Extend your arms in opposite directions (a). Lift your right arm and bend your elbow to rest your palm on your upper back. Place your left palm on your right elbow. Push your hips slightly forward to feel a stretch in your right side (b).

TRIANGLE

Extend your arms and bend your right knee to return to warrior II. Push your right foot into the mat as you straighten your right leg. Shift both hips back as you tilt your upper body forward and reach for the front of the room with your right hand. Rest your right hand on your shin or ankle and reach your left arm toward the ceiling.

Yoga Poses for Flexibility, 16 Most Effective Asanas!


Flexibility has many health benefits, including healing aches and pains, helping with balance, and injury prevention.  Stretching the muscles can also help relieve tension and stress, which can cause all sorts of problems, including weight gain.

These yoga poses for flexibility are broken down into 3 categories: Hamstrings, Hips, and Back
They are also listed in order of difficulty, with the easiest and lightest stretches first.  Pick an area to work on, and start from the top!
This is also important, because you will increase your flexibility the quickest when the body is properly warmed up first.
In other words, don’t jump right into a 30 second stretch on a really tight muscle.  Work your way into stretching the muscle by doing other, lighter stretches first.
Try to hold each pose for at least 30 seconds.  Some will need to be repeated on the other side of the body as well.
If you’re looking to take your flexibility to the next level, work up to holding each pose for at least 1 minute.
It’s also a good idea to set certain days of the week to work on certain muscle groups.  It can be difficult and overwhelming to try to work on all 3 of these muscle groups every single day. You will likely end up not giving enough attention to any of them.
Try performing the yoga poses for flexibility for each muscle group at least twice per week if you are looking to increase your flexibility fast!
.

16 Yoga Poses for Flexibility

Hamstrings

There are a lot of “bends” in these yoga poses for flexibility.  They are by far the most effective stretches for increasing flexibility in the hamstrings.
If you begin to get bored practicing them over and over, we suggest you catch up on your favorite TV show to distract you.  It’s a great way to get your stretches in and not feel bored or have excuses to skip them!
downward facing dog yoga pose for flexibility

Downward Facing Dog (Adho Mukha Svanasana)

This is a great pose to start with, because it helps to open up the legs, shoulders, and chest before you get into some of the deeper stretches.
The most important part of this pose is keeping the back straight.  Try practicing it in front of a mirror, and you will likely notice that your lower back is bending.
As you practice this pose more and increase the flexibility in your legs, ankles, and hamstrings, you will notice that your back will flatten out over time.
Ground your palms into your mat, and bring the head in a little closer to the knees to increase the stretch in your shoulders and chest.
It also helps to “pedal” the feet in this pose, meaning bringing one foot up on the toes at a time while the other is flat on the ground (a pedaling motion).
Hold for 30 seconds.
head to knee pose for flexibility

Head-to-Knee Forward Bend (Janu Sirsasana)

This poses is a very important pose on the list of yoga poses for flexibility.
Depending on your natural flexibility, you may or may not be able to even touch your feet.  Don’t worry if you can’t! If you practice these hamstring stretches 2-3 times per week, you will be pleasantly surprised at how quickly that will change!
In any case, reach as far as you can or use a yoga strap until you can reach your toes.
Keep the back straight and flat in this pose, because it will increase the stretch in the hamstrings.  Try to avoid hunching over.
Hold for 30 seconds.  Repeat on the other side.
seated forward bend yoga pose for flexibility

Seated Forward Bend (Paschimottanasana)

This is the same concept as the pose above except with both feet in front of you.
This can also be done from a standing position, and you should try both after you try the standing half forward bend (farther down this list).
Again, keep the back as straight as possible when you are leaning forward.
It’s more effective to lean forward at the hips rather than at the waist, which leads to hunching over and a lighter stretch.
wide angle seated forward bend for flexibility

Wide-Angle Seated Forward Bend (Upavistha Konasana)

Spread your legs as wide as you can while still keeping them straight.  Place your hands on the ground in front of you, and begin to lean forward at your HIPS, not your waist.
When you lean forward at your waist, you will end up hunching your back.  Keep your back as straight as possible.
This will result in you not getting as “far” as you would if your back was hunched but keeping a straight back is the proper form and will be more effective in stretching the muscles to increase flexibility.
This pose can be more effective as an assisted stretch if you have someone that can put a little pressure on your back for you.

Yoga Poses to Ease Post-Workout Muscle Soreness.


importance_flexibility_mobility_fitness
So you killed leg day, but now you can’t even walk to the bathroom without being in pain. Post-workout muscle soreness is both a good thing and a bad thing. It’s a good thing because that indicates that you had a successful, muscle-building workout. Soreness is caused by the micro-tears in the muscles from working really hard. If you are sore, good job! You are building muscle.
Unfortunately, muscle soreness is can also be pretty uncomfortable- even painful- and also quite inconvenient in a lot of situations. If you work out a lot, you are going to be sore all the time, and that’s just no fun. 
Here are yoga poses for post-workout muscle soreness. These poses will help ease muscle soreness, as well as increase your mobility & flexibility for your future workouts.

Yoga Poses for Post-Workout Muscle Soreness:


Arms:

yoga poses sore muscles post workout
Standing Forward Bend
Clasp your hands together behind your back, hinge forward at the hips, let your head hang, and bring your arms overhead. Sway slowly from side to side, letting the weight of your arms stretch your shoulders at different angles.
yoga poses sore muscles post workout
Standing Side Bend
Stand with your feet together and your arms overhead with your palms together. Keeping your arms straight- or close to straight- lean to the left and right, taking the time to feel your sides open.
yoga poses sore muscles post workout
Wide Legged Forward Bend Twist
Stand with your feet placed 3-4 feet apart, and hinge your torso forward at the hips. “Roll” your spine down and rest your hands on the floor, letting your neck & head relax. Bring one arm upwards and look up at it, feeling your spine twist and open. Switch arms and repeat.

Legs:

yoga poses sore muscles post workout
Standing Forward BendStand with your feet together, and bend over, “rolling” your spine down as you reach towards the floor. Let your neck relax and your head hang.

yoga poses sore muscles post workoutReclining Bound Angle Pose
Start in an upright (sitting) Bound Angle Pose (the “butterfly” stretch), then roll your spine back until your are laying down. This will stretch your hip flexors (and ladies take note, this pose is also great for relieving menstrual cramps).
yoga poses sore muscles post workout
Camel Pose (Ustrasana)
Begin on your knees, with your arms at your side, looking straight forward. Slowly draw your arms up over your head, then using one arm at a time, reach your hands behind you to grasp your heels. Make sure your hips are positioned over your knees, then relax your neck and shoulders so your head hangs back and your throat feels “open”.
yoga poses sore muscles post workout
Crescent Lunge
Start in a high lunge, then slowly lower the back knee down to the floor. Keep your torso to an upright position, and make sure your front knee does not extend forward over your toes.

Back:

yoga poses sore muscles post workout
Wind-Relieving Pose
Lay with your back flat on the ground and legs fully extended. Bring both knees in towards your chest, clasp your hands around your legs, and round your back so your buttocks come slightly off the floor. Attempt to bring your forehead to your knees, then rock slowly from side to side to gently massage your spine.
yoga poses sore muscles post workout
Two Knee Spinal Twist
Lay with your back on the ground, and your knees bent. Let your knees fall to one side, and look in the opposite direction, with your arms extended to both sides.

yoga poses sore muscles post workoutChilds Pose
Sit with your knees slightly apart and folded underneath your body, then lean forward to rest your forehead on the ground. Rest with your arms by your sides, or increase the stretch by reaching your arms forward.
yoga poses sore muscles post workoutPlow Pose
From a sitting position, roll your spine backwards and down to the floor, and bring your knees into your chest. Place your hands on your lower back for support as you extend your legs upward towards the ceiling. Finally, lay your arms on the floor when you are stable, lower your legs down towards your face, and aim to touch your toes to the floor above your head.
yoga poses sore muscles post workoutDownward Dog
Stand with your feet together, hinge forward at the hips, and bend your knees so that your palms are flat on the floor (if they aren’t already). Shift your weight so that your arms are supporting you as you hop or walk your legs back. Use your hands to push your body back towards your heels until you feel a stretch throughout your back and legs

Abdomen:

yoga poses sore muscles post workoutSide Plank Pose
Starting from either Plank Pose or Downward Dog (whatever you are more comfortable with) shift your weight to one arm, and rotate your body to the side. Engage your core and lift your hips upwards, and extend your free arm overhead.
yoga poses sore muscles post workout
Sphinx Pose
Lay on your stomach and place your elbows below your shoulders. Prop yourself up on your forearms, taking care to keep your shoulders down and away from your ears.
yoga poses sore muscles post workoutCobra Pose
Lay on your stomach and place your hands flat on the floor beneath your shoulders. Slowly press up with your arms, straightening them only to the a point that is still comfortable for your back. Take care to keep your hips on the ground, and your shoulders away from your ears.

YOGA POSES - BEGINNERS

YOGA BASIC MOVEMENTS

These movements are very useful to beginners, who want to start doing yoga but don't have any experience of yoga or any other exercise.
There are several joints in our body, which needs lubrication and movements. The food we consume supplies the lubrication and Yoga and other activities provide the movements. In our regular life some of these joints are overused and some are rarely used which may create problems at later stage in your life. To help these joints maintain their healthy condition Basic Movements are necessary also they are useful to prepare your body to take up Yoga.

PREREQUISITES FOR YOGA

Below 12 years of age Yoga postures should not be practiced for long duration and asanas are to be maintained for very short duration.
Every day you should practice Yoga for at least 30 to 45 minutes to get maximum results.
The best suited time to practice is early morning hours, but it can be practiced in the afternoon after following food restrictions.
Food restrictions - stomach should be empty while practicing, that is you should consume solid food 3.5 hours before practicing and liquid 1 hour before.
Place should be spacious, clean, airy, bright and away from disturbances.
Yoga should not be practiced on bare floor but keep mat or carpet below.
Clothes should be comfortable, loose, clean. Undergarments are necessary.
Yoga prefers vegetarian diet. But avoid spicy and hot diet as much as possible.
Women should not practice Yoga during Pregnancy and menstruation.
One should have faith in Yoga and what he is doing.

BENIFITS

  1. As your body relaxes all your muscles also relax except those muscles, which are used in the movements, so one can easily concentrate on the movement / particular muscle (effort).
  2. Aged and persons having diseases also can do these movements without much strain.

YOGA POSITIONS OR ASANAS

Asana system is the 3rd in Ashtanga yoga, yogasana help achieve physical health, control over mind and power of concentration.
Patanjali has described Yogasana as "Sthir Sukham Asanam", which means a posture that is stable and pleasant. A more broad definition of Yogasana according to Patanjali is "Tatodwanabhighatah" which means practice of Yogasana leads to disappearance of duality of cold-hot, sadness-joy, happiness-sorrow and so on.
Yoga is different from exercise as it doesn't involve speedy movements, but instead very slow and steady movements.
Yoga helps achieve relaxation which reduces stress & strain.
Very few calories are consumed during Yogasana practice and metabolism rate of the body also drops which means reduced Aging Process.
Less food is required as digestive power is increased.

PRE POSITION

Standing Position
Sitting Position
Supine Position
Prone Position

Standing
Sitting
supine
prone

NECK MOVEMENT

NECK MOVEMENT

NECK MOVEMENT - 1

Aim - To increase the flexibility and stamina of neck muscles.
Precaution - People with neck problems like spondilytis should avoid forward bending.
Procedure - Sit in the Vajrasana Position, keep your neck straight, then slowly but without jerk start rotating neck clockwise from left shoulder to backwards then to the right shoulder and to front. Repeat this in anticlockwise direction starting from right shoulder.
NECK MOVEMENT

NECK MOVEMENT - 2

Aim - To increase the flexibility and stamina of neck muscles.
Precaution - People with neck problems like spondilytis should avoid forward bending.
Procedure - Sit in the Vajrasana Position, keep your neck straight, then slowly but without jerk start rotating neck clockwise from left shoulder to backwards then to the right shoulder and to front. Repeat this in anticlockwise direction starting from right shoulder.

SHOULDER MOVEMENT

SHOULDER MOVEMENT

SHOULDER MOVEMENT - 1

Aim - To increase the flexibility and stamina of neck muscles.
Precaution - No specific precautions.
Procedure - Sit in the Vajrasana Position, keep your body straight, with arms by side. Then slowly but without jerk lift your both shoulders upwards as much as possible near to ears, back to normal position.
SHOULDER MOVEMENT

SHOULDER MOVEMENT - 2

Aim - To increase the flexibility and stamina of shoulder and back muscles.
Procedure - Sit in the Vajrasana position, keep your body straight, fold you hands and place left fist on left shoulder and right fist on right shoulder, bring both your elbows together near chest, then slowly but without jerk rotate both these arms in opposite direction, (left arm anticlockwise and right arm clockwise) Repeat this in opposite direction (right arm anticlockwise and left arm clockwise).
Benefits - This posture is useful for people with back problems.

HAND MOVEMENT

HAND MOVEMENT

HAND MOVEMENT - 1

Aim - To increase the flexibility and stamina of hand & shoulder muscles.
Precaution - If you feel strain while lifting your hands above ground then do this with your hands resting on ground.
Procedure - Relax in Shavasana position, keep your hands 6 inches away from your body, legs separated with 12 inch distance between them, lift your hands 1 to 1.5 inch above ground and slowly rotate them towards head without bending elbows, keep the hands parallel to the ground till both the palms meet, place left palm on right palm and stretch hands upwards and legs downwards for 5 to 10 seconds, then slowly but without jerk rotate both the hands back to the normal position via the same path.
Benefits - This posture is useful in increasing the strength of neck, shoulders and the stretching helps retain normal posture.
HAND MOVEMENT

HAND MOVEMENT - 2

Aim - To increase the flexibility and stamina of hand & shoulder muscles.
Precaution - do not bend elbows while doing this.
Procedure - Relax in Shavasana position, keep your hands 6 inches away from your body, legs separated with 12 inch distance between them, raise your hands above ground and slowly take them towards head without bending elbows, place both hands on the ground, stretch hands upwards and legs downwards for 5 to 10 seconds. Then slowly but without jerk bring both the hands back to the normal position via the same path.
Benefits - This posture is useful in increasing the strength of neck, shoulders and hands, the stretching helps retain normal posture.
HAND MOVEMENT

HAND MOVEMENT - 3

Aim - To increase the flexibility and stamina of hand & shoulder muscles.
Precaution - do not bend elbows while doing this.
Procedure - Relax in Shavasana position, keep your hands 6 inches away from your body, legs separated with 12 inch distance between them, raise your hands above ground and slowly take them towards head without bending elbows, place both hands on the ground, stretch hands upwards and legs downwards for 5 to 10 seconds. Then slowly but without jerk bring both the hands back to the normal position via the same path.
Benefits - This posture is useful in increasing the strength of neck, shoulders and hands, the stretching helps retain normal posture.

HAND MOVEMENT - 4

Aim - To increase the flexibility and stamina of hand & shoulder muscles.
Precaution - If you feel strain while lifting your hands above ground then do this with your hands resting on ground. The movements should be slow and continuous.
Procedure - Relax in Shavasana position, keep your hands 6 inches away from your body, legs separated with 12 inch distance between them, lift your hands 1 to 1.5 inch above ground and slowly rotate them towards head without bending elbows, keep the hands parallel to the ground till both forearms cross, in this same cross position raise the arms above and on to the stomach, then slowly bring both the hands back to the normal position.
Benefits - This posture is useful in increasing the strength of neck, shoulders and the stretching helps retain normal posture.

LEG MOVEMENT

LEG MOVEMENT

LEG MOVEMENT - 1

Aim - To increase the flexibility and stamina of legs & hip muscles.
Precaution - The movements should be slow & continuous.
Procedure - Relax in Supine position, keep your hands around head rotating them side ways, then lift your left leg and bring it near to the hip, repeat this procedure for the right leg. Then slowly bring both the hands back to the normal position
Benefits - This helps development of the leg muscles and hip joints.
LEG MOVEMENT

LEG MOVEMENT - 2

Aim - To increase the flexibility and strength of legs & hip muscles.
Precaution - The movements should be slow & continuous. Do not bend the knees.
Procedure - Relax in Supine position, keep your hands close to your body, then lift your left leg 30 to 40 degrees above ground level and rotate it in the clockwise direction without bending knees, repeat this procedure for the right leg.
Benefits - This helps leg muscles and hip joints.
LEG MOVEMENT

LEG MOVEMENT - 3

Aim - To increase the flexibility and stamina of legs & hip muscles
Precaution - The movements should be slow & continuous. Do not bend the knees.
Procedure - Relax in Supine position, Move your hands around and place them at shoulder height, parallel to the ground, then lift your left leg and turn it to the right side as far as possible touching the ground. Repeat this procedure for the right leg. Then slowly bring both the hands back to the normal position.
Benefits - This helps leg muscles and hip joints.

KNEE MOVEMENT

Aim - To increase the flexibility and stamina of neck muscles.
Precaution - People with neck problems like spondilytis should avoid forward bending.
Procedure - Sit in the Vajrasana Position, keep your neck straight, then slowly but without jerk start rotating neck clockwise from left shoulder to backwards then to the right shoulder and to front. Repeat this in anticlockwise direction starting from right shoulder.
Benefits - This helps knee joints and hip joints.

Monday, November 13, 2017

7 Easy Steps to Starting Your Home Yoga Practice Today.

Starting your own home practice can seem daunting, confusing and awkward. But instead of using that as an excuse, let’s embrace it.
Here are seven steps that will make starting your own yoga practice today far easier than you thought:
1. Just start.
A home yoga practice isn’t just for those who are teachers or those who have “been doing yoga forever.”
There’s no specific time when you are ready to start your own home practice, but if you’ve thought about it, I’d say the time is now. Getting lead by a teacher in a class is awesome, but there comes a time, when to dig even deeper, you have to cultivate your own practice.
Practicing your own yoga sequence tailored to how your body feels, the mood you’re in and what’s going on in your life is something magical that only you can create.
2. Keep it short.
The goal of a home practice is not to reach 60 or 90 minutes of graceful, perfect flow. The goal is to move, feel good, and de-stress. Start with even just a couple minutes and see where it takes you.
3. Be okay with it feeling awkward.
Even if you have been taking group classes for years it will feel strange not being led by someone. Embrace the awkward and drop the judgments. Give yourself time to get used to it. you will eventually. It doesn’t need to look pretty.
4. Your mind will wander, your roommate will interrupt, your dog will lick your face.And that’s fine. If you have a space where you can be uninterrupted that’s a plus, but most of us don’t. Eventually you will learn to not feel so weird in front of whoever might be getting ready for work around you. Heck, maybe they’ll join you.
Slowly but surely, the space in which you roll out your mat, wherever that may be, will feel like your yoga space regardless of what is happening around you or what the space looks like.
5. Put your phone and computer out of sight and earshot.
This is an obvious one. Unplug and make these distractions a no-brainer by keeping them away. They will be there when you’re done.
6. Pick poses (or even just one) that feel good.
See what comes natural to you. Is there a pose in a yoga class that you just love when it comes up because it feels so awesome? Try that one. Are you feeling achy in certain places from exercising the day before? Anything in life that’s keeping you hung up? Hone in on that.
Yoga is linking breath with movement. It’s that simple. So if all you’re in the mood for are some simple relaxing stretches, that’s yoga.
7. Stick with it (and have fun!)
Just like anything else, a routine takes repetition. Give yourself time to get into a rhythm without judgment or striving for perfection. Go on and get silly when you want to, move in easy ways that feel good, and most importantly: do what will put a smile on your face.

The Red Tea Detox - Weight Loss System - WATCH NOW

The Red Tea Detox by Liz Swan Miller is a new rapid weight loss system that can help you lose 14 pounds of pure body fat in jus...